Deploying a multi node Jenkins 2.0 environment with Docker and CoreOS - Part 1
In this post i will show you how to setup a multi node jenkins cluster running in a docker-swarm on coreos. In part 1 we will get a docker-swarm enabled cluster running. In part 2 we will use this docker-swarm to run jenkins.
The following diagram will give you an overview of the final architecture:
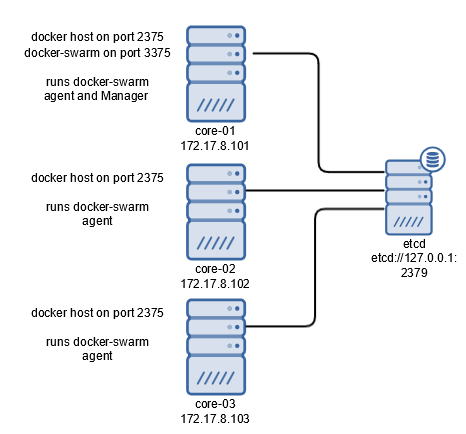
There are three hosts running coreos in this example. The advantage of using coreos is, that a lot of the needed services to manage a distributed system are already included. On all hosts etcd is running as a distributed key-value store. This directory allows the registration and discovery of services. The docker-swarm will use this facility. The docker-swarm agent on each machine will register this docker host in etcd. The docker-swarm manager on the first host will query etcd for the currently registered hosts. The other responsiblity of the manager is to provide the docker API over the network on port 3375 to access the docker-swarm.
Prepare your dev machine
For an production environment you would usually have a virtual infrastructure to provision your machines. For the sake of simplicity i’m using local virtual machines with Vagrant for this tutorial. Vagrant supports the easy creation and configuration of virtual machines. The default VM software is VirtualBox from Oracle. But there are other Vagrant Providers too, notably for Hyper-V and VMWare.
The following software will be needed. If you already have this running, feel free to go to the next step Setting up coreos cluster.
- Vagrant (current version
1.8.5) - VirtualBox (current version
5.1.2) - Git client (current version
2.9.2) - Docker Toolbox (version
1.10.3, Be aware, that this is not the current version and newer version will not work right now)
For this tutorial i’m going to use a Windows 10 machine. But you should be fine with a Linux or MacOs client too. Most tools have a strong Linux background and the support there is often better.
So let’s first install the following software: 1. Vagrant
Just download the installer for your platform from the Download Vagrant site.
At the time of this writing the current version is 1.8.5. There are no more options other than to choose the install
location. After installation you are asked to reboot your machine. Don’t do so right now, because we are going to install
some more software first.
- VirtualBox
Vagrant needs a runtime to provision the machines. For this tutorial the runtime will be Virtual Box. So head over to the
VirtualBox download site and grab your copy of the current version. At the time
of this writing this will be version 5.1.2. Using the checked default options for the installation is fine.
Important: Modern CPUs support virtualization with special instructions, called VT-X for X86 based Intel CPUs. This feature can only be used by one vm host at a time. If you have Hyper-V enabled, you need to disable it. Unfortunately the Vagrantfile for coreos we are going to use doesn’t support Hyper-V yet.
- Git
The project files and templates are hosted on Github. To access them, we need to have an git client
installed. So grab the installer for Windows and run it. The current version at the
time of this writing is 2.9.2. Again, the checked default options would be fine. I prefer to set
‘Use Git and optional Unix tools from the Windows Command Prompt’ though, to have access to nifty tools like curl.
Next you should configure git. To do this open a command prompt and type in the following:
git config --global user.name "<insert your name>"
git config --global user.email "<insert your email>"
If you are behind a proxy you can set it as follows:
git config --global http.proxy "<insert your proxy url here, e.g. http://<proxy_host>:<proxy_port>>"
To list the current configuration you can use git config --global --list. More information can be found in the
git-scm book.
Now is the right time to reboot your machine.
Setting up coreos cluster
TLDR; If you just want a quick way to get an docker-swarm cluster use the following commands:
git clone https://github.com/ender74/coreos-vagrant.git
cd coreos-vagrant
vagrant up
This will start an docker-swarm cluster with three hosts. The swarm can be accessed under the url tcp://127.0.0.1:3375.
Read on if you are interested how this is done and how to configure it.
Now is the time to actually get a cluster with multiple coreos hosts running. Fortunately, there is a repository on github which provides a Vagrant configuration to start with. An description of the installation can be found here. To start let’s clone the repository. Open a command prompt and type in:
cd <put in your base directory here>
git clone https://github.com/coreos/coreos-vagrant.git
This will create a new folder coreos-vagrant in your current working directory. The next step is to copy the files config.rb.sample as config.rb and user-data.sample as user-data.
Now open config.rb. Here we must change the number of instances for our cluster ($num_instances). Please change the default value of 1 to your desired instance count. I’m using 3 as example. You can leave the default values for the other options.
Open user-data next.
Now it’s time for the first test. Open a command prompt and type in:
cd <put in your base directory here>/coreos-vagrant
vagrant up
This will configure three new coreos machines core-01 … core-03 with VirtualBox and bring them up. To test it, you can
connect to the first machine with ssh by typing vagrant ssh core-01. There should be a command prompt for core@core-01.
To check the correct setup as a etcd cluster, you can type in etcdctl member list. You should see a list with your
three machines, e.g.:
core@core-01 ~ $ etcdctl member list
9eed6d78e628794: name=05cc8343587c4781882e5a71fed5c116 peerURLs=http://172.17.8.101:2380 clientURLs=
http://172.17.8.101:2379 isLeader=true
44207120f5a2eda9: name=97926f92edba451581a82ea2bc49724b peerURLs=http://172.17.8.102:2380 clientURLs
=http://172.17.8.102:2379 isLeader=false
7bdce6af11478231: name=baa04b753fc1493da85d15580c5cae75 peerURLs=http://172.17.8.103:2380 clientURLs
=http://172.17.8.103:2379 isLeader=false
You can check the availability of docker with docker run hello-world. This should result in an ‘Hello from Docker!’ screen.
Now close the shell by typing exit and stop the virtual machines with vagrant halt.
Installing docker-swarm in the cluster
Right now we have three distinct machines with a docker host running. We could connect to each machine to run docker commands. But to make our life easier, we can connect the three hosts to build one virtual docker host - a docker swarm. The advantage of using docker-swarm is, that we can use this swarm like we would use a single host, e.g. with the same tools. If you run a container, docker-swarm selects one host from the swarm with enough free resources and runs it there. The next container you start might happen to run on a other host of your swarm transparently.
To do so, we need to make some changes to the configuration. So open the file Vagrantfile. The first sections takes care of loading the config files. The configuration itself starts with the Vagrant.configure call at line 48. The set number of instances is configured in the loop starting at line 78.
We need to expose port 3375 on the first machine (our docker-swarm manager). To do so, add the following lines just before the end of the loop (line 145):
# configure docker-swarm
if (i == 1)
    config.vm.network "forwarded_port", guest: 3375, host: 3375, host_ip: "127.0.0.1", auto_correct: true
end
# end of docker-swarm configuration
Next we need to actually run our docker-swarm agents on all hosts and the docker-swarm manager on the first host. To do so, we need to run a script at the provisioning time in vagrant. To do so, change the docker-swam configuration as follows:
# configure docker-swarm
if (i == 1)
    config.vm.network "forwarded_port", guest: 3375, host: 3375, host_ip: "127.0.0.1", auto_correct: true
    #start docker-swarm manager on first host
    config.vm.provision "shell" do |s|
        s.inline = "docker rm -f swarm-manager; true && docker run -d --name swarm-manager --net=host --restart always swarm:latest manage -H tcp://$1:3375 etcd://127.0.0.1:2379"
        s.args = [ip]
    end
end
#start docker-swarm agent on all hosts
config.vm.provision "shell" do |s|
    s.inline = "docker rm -f swarm-agent; true && docker run -d --name swarm-agent --net=host --restart always swarm:latest join --addr=$1:2375 etcd://127.0.0.1:2379"
    s.args = [ip]
end
# end of docker-swarm configuration
To start the docker containers we need to add the following new systemd Units to our cloud-config file user-data:
- name: enable-docker-tcp.service
  command: start
  enable: true
  content: |
    [Unit]
    Description=Enable Docker Socket for the API

    [Service]
    ExecStartPre=/usr/bin/systemctl stop docker.socket
    ExecStartPre=/usr/bin/systemctl stop docker-tcp.socket
    ExecStartPre=/usr/bin/systemctl stop docker
    ExecStart=/usr/bin/systemctl enable docker-tcp.socket
    ExecStartPost=/usr/bin/systemctl start docker.socket
    ExecStartPost=/usr/bin/systemctl start docker-tcp.socket
    Type=oneshot
    RemainAfterExit=true

    [Install]
    WantedBy=network.target
- name: start-docker-swarm.service
  command: start
  enable: true
  content: |
    [Unit]
    Description=Start Containers for docker-swarm
    After=enable-docker-tcp.service

    [Service]
    Restart=always
    ExecStart=/usr/bin/docker start swarm-agent;/usr/bin/docker start swarm-manager;true
    ExecStop=/usr/bin/docker stop -t 2 swarm-agent;/usr/bin/docker stop -t 2 swarm-manager;true

    [Install]
    WantedBy=default.target
The first one restarts the docker socket services. This is a hack, to prevent the problem that docker is sometimes not
available over TCP/IP (see this issue on github for explanations). The second
Unit does start the swarm-agent and swarm-manager containers. This seems to be needed because the --restart always
flag in the docker run command does not seem to work reliable right now. Maybe with newer versions both Units will be
obsolete. But right now, this was my only solution to get it to work reliable.
Now it’s time to start our cluster again. To have our changes applied, we need to tell vagrant to provision the machines
again. To do so, type vagrant up --provision into the console and connect to the first machine (vagrant ssh core-01).
To see the running docker container type in docker ps. You should see two running containers (one for the docker-swarm agent
and one for the docker-swarm manager). To check that all nodes have registered themself, you can query etcd as follows:
core@core-01 ~ $ etcdctl ls /docker/swarm/nodes
/docker/swarm/nodes/172.17.8.103:2375
/docker/swarm/nodes/172.17.8.102:2375
/docker/swarm/nodes/172.17.8.101:2375
This should give you a list with one entry per node. To test the docker-swarm, you need to tell your docker client to
connect to the docker host at port 3375. You can add the host parameter to all your docker calls like
docker -H tcp://$COREOS_PUBLIC_IPV4:3375 info. If you want to test more than one command, it is more easy to define
an environment variable DOCKER_HOST as follows:
export DOCKER_HOST=$COREOS_PUBLIC_IPV4:3375
When you now execute docker ps, there should be no error message but no running containers too. The reason is, that you are
querying the docker-swarm, which has no running containers yet. To check this, you can use docker info. This should show
Server Version: swarm/1.2.4 together with some other status information to prove, that your docker-swarm is running. If you
run docker run hello-world the hello-world container runs as usual, but within your swarm. You can exit the ssh shell.
Overlay networks
There is one final step missing. If you deploy multiple containers to your swarm which need to communicate with each other, you have to provide a network for this. Docker supports different network types. For this scenario (containers running on different docker hosts) we need an overlay network. To do so docker needs a key-value store to share information about the participants of this network. At startup you need to give docker the address of this key-value store. Fortunately, the key-value store (etcd) is already running. So all we have to do is to extend the configuration of the docker service in the cloud config (user-data file) as follows:
- name: docker.service
  drop-ins:
    - name: 10-docker-swarm.conf
      content: |
        [Service]
        Environment="DOCKER_OPTS=--cluster-advertise eth1:2375 --cluster-store etcd://127.0.0.1:2379"
Security
Right now the access to our docker hosts is unsecured. Anyone with network access to the appropriate port can issue commands.
Installing Docker Toolbox on the dev machine
Working with your docker-swarm would be more easy, if you could just use the usual docker commands on your development
machine. The Docker Toolbox makes this possible for your Windows or
MacOS client. Unfortunately at the time of this writing, you can’t just grab the latest version. The current coreos release
contains docker version 1.11. The current Docker Toolbox is version 1.12. Docker Clients use a REST API to communicate
with the Docker Host. This API is versioned and the client must have exactly the same version as the host. To make things
even more complicated, the API version doesn’t necessarily matches the Docker version. So even when using the Docker Toolbox
version 1.11 for Windows, there will be an API mismatch error. Right now i found only the combination of Docker Toolbox
version 1.10.3 together with the docker host 1.11.2 provided by coreos alpha channel
to work. Fortunately all Docker releases are archived on github. So just grab your copy of the
Docker Tools v1.10.3 and run it. In the component selection
screen you should de-select VirtualBox, because we have it already installed. Usually i would uncheck docker-machine too,
because we are using Vagrant for this purpose. But this is not possible right now.
After installation you just need to point docker to the adress of your docker swarm. To do this, define a new environment
variable DOCKER_HOST with the value tcp://172.17.8.101:3375. Using the docker commands like docker ps or
docker info should work now and give you access to your swarm.